Scan Launch
The scan launch can be performed in manual or automatic mode. You can start the scan using the Scan execution main menu item.

The Run scan page contains the fields required to start a scan of the application:
- The Select file button at the top right allows you to select an application file (*.apk or *.ipa) to download. As long as the application file is not selected, the other fields on this page are not available for editing.
Note: If a package with the chosen name and hash sum is already uploaded, in order to save resources it is not downloaded again, but the file already present on the server is used.
After downloading a file of the application under test, the following information about it is displayed at the top of the page: Package name, Version name/Version code, Target SDK, Min SDK, File name /size/hash and Architecture type. - Project — Name of the project where the scan is performed.
Note: You can select either projects with an empty Package name field (see the Projects section), or projects that have the package selected in the previous step in this field. Thus, it is possible that there will be no items available for selection in this field. In this case, you should create a new project with an empty Package name field or by specifying in it the corresponding package. - Profile — Scan profile used to scan the application.
- Type — Manual or automatic scanning mode.
- Test case — this field appears if you select automatic mode. The test case to be executed should be selected from the drop-down list of available test cases.
Note: Only test cases of the selected project are displayed. - Architecture — The architecture of the device used to launch and scan the application.
Auto Scan
To start scanning in automatic mode, perform the following steps:
- Select and download mobile application file with *.apk or *.ipa extension for scanning.
Note: If a package with the chosen name and hash sum is already uploaded, in order to save resources it is not downloaded again, but the file already present on the server is used. - Select a project from the drop-down list of existing projects.
Note: You can select either projects with an empty Package name field (see the Projects section), or projects that have the package selected in the previous step in this field. Thus, it is possible that there will be no items available for selection in this field. In this case, you should create a new project with an empty Package name field or by specifying in it the corresponding package. - Select a scanning profile from the drop-down list.
- Select Auto scan mode from the drop-down list.
- In the newly appeared field below, select the name of a test case that already exists in the system to start scanning in automatic mode.
- Select the architecture to perform the scan. Note that in this field is available for selection only the architecture active in the system, where the test was recorded.

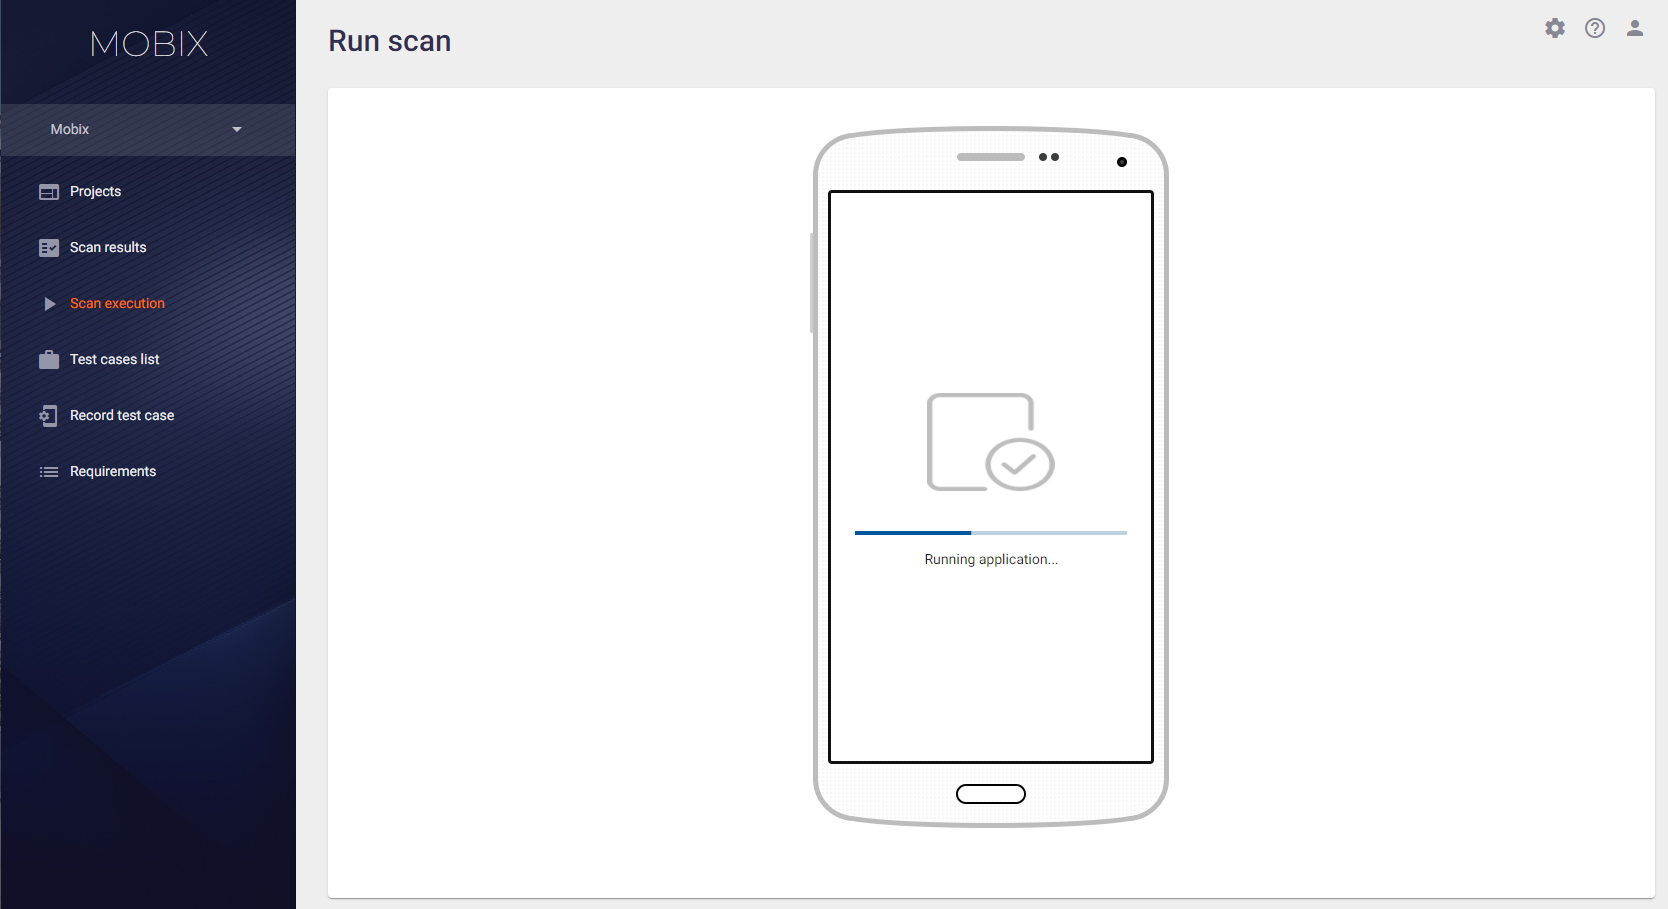
Click the Run scan button to start the scan. A page with the device screen without the ability to interact with it will appear. A dynamic view of the device screen is necessary to analyze the operation of the test case. During the scan, the following statuses are displayed on the screen of the device:
- Finding free engine… — the free scanning engine is searched for.
- Running application… — the application runs.

While an auto scan is in progress, a video is also recorded. After the scan is complete, it is available in the View video record tab of the Scan result page for this test.
Clicking the To scan results button will take you to a page with a list of all scans. If you go to the Scan results page, you can see a new line showing the current result of the automatic scan with the status Started. If you click on a table row when the corresponding scan has the status Created, Starting or Started, you are returned to the page with the device screen. Once the application scan is complete, the status will change to Analyzing while the results are being processed. Then the scan status will change to Success or Failed depending on the scan result. If you click on the line when the scan has a status of Analyzing, Success or Failed, it will take you to the Scan result page, see the Scan Results section.
Manual Scan
To start scanning in manual mode, select the Scan execution main menu item.

To start scanning in manual mode, perform the following steps:
- Select and download mobile application file with *.apk or *.ipa extension for scanning. When you load a file, the system will detect its architecture and filter out all the necessary values in the next fields.
Note: If a package with the chosen name and hash sum is already uploaded, in order to save resources it is not downloaded again, but the file already present on the server is used. - Select a project from the drop-down list of existing projects.
Note: You can select either projects with an empty Package name field (see the Projects section), or projects that have the package selected in the previous step in this field. Thus, it is possible that there will be no items available for selection in this field. In this case, you should create a new project with an empty Package name field or by specifying in it the corresponding package. - Select a scanning profile from the drop-down list.
- Select the architecture to perform the scan.
- Select Manual scan mode from the drop-down list.
Click the Run scan button to start the scan. The page with the device screen and the running application will be displayed. Manual scanning looks like a normal user's work with the application. All user actions are recorded as a sequence of test case steps.
After all the necessary steps to scan the application are done, click the Terminate button at the bottom right. After the clicking, the scanning will stop, the system will start analyzing the scan data and proceed to the Scan results page. You can identify the results of the manual scan by the data in the Modified column.
Processing the scan results takes some time. So you have to wait until the results are processed before you can view and analyze them in detail. The scan status in the Status column can have several values:
- Created — the scan was created and placed in the scan queue.
- Starting — the scan is already being processed and the necessary technical preparations before the launch are underway (installation of the application, launching the application, etc.)
- Started — the scanning process is in progress and interaction with the application is performed manually or through test cases, depending on the type of scanning.
- Analyzing — the interaction with the application is over, the analysis of the collected data is in progress.
- Failed — the scan was completed with errors.
- Success — the scan was completed successfully and without errors.

Launching a Scan from the Command Line
The application scan can be launched not only from the user interface, but also from the command line. The process of forming a command line and launching a scan is described in detail in the Integration section of the Installation, Setup, and Integration Guide.
Launching a Scan from Distribution Systems
There exist tools for launching application scans from distribution systems that make this process much easier. Launching a scan from distribution systems is described in detail in the Integration section of the Installation, Setup, and Integration Guide.